
Redux 기본학습-1
생활코딩의 리덕스 강좌를 보면서 학습한 내용 정리용.
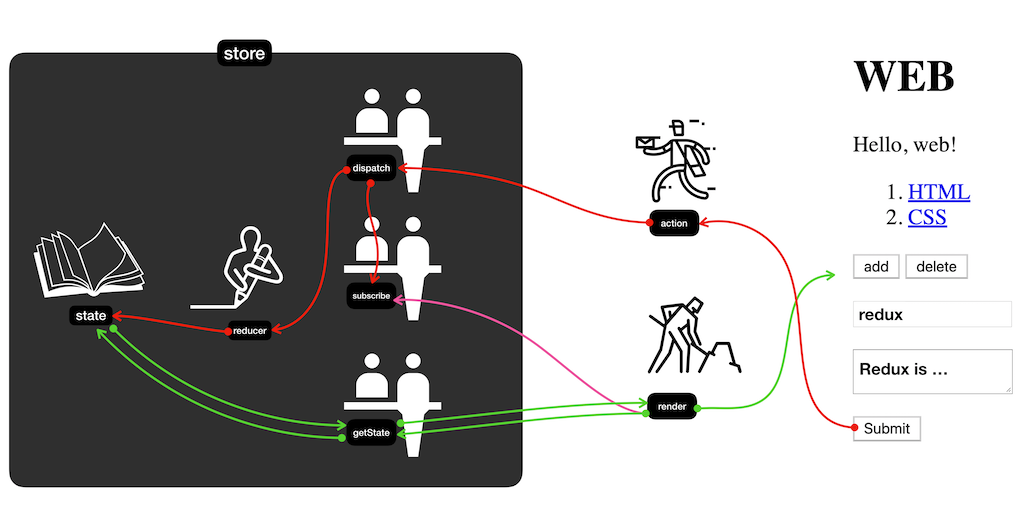 생활코딩에서 redux를 설명해 놓은 이미지 인용.
1. 강의 2 - state와 render의 관계 학습 메모
- render : state 값을 참조해서 ui를 만든다.
- subscribe : render 함수를 subscribe에 등록시켜두면 state값이 바뀔때 마다 render 함수가 호출되면서 UI가 새롭게 갱신된다. 사용은
store.subscribe(render);이런 식으로 한다.
2. 강의 3 - action과 reducer
- dispatch 가 하는 일. 1, reducer 를 호출해서 state 를 바꾼다. 그 다음에 subscribe 를 이용해서 render 함수를 호출한다(화면갱신).
- dispatch 가 reducer 를 호출할때 두개의 값을 전달하는데 한개는 현재의 state값. 하나는 action, 즉 dispach 를 통해서 보낸 데이터를 전달한다.
- reducer 는 state를 입력값으로 받고 action 을 참조해서 새로운 state값을 만들어서 return 해주는 state 를 가공하는 state의 가공자임.( re(act state pro)ducer 라고…)
- state가 바뀌면 dispatch 가 subscribe에 state가 바뀌었다고 신호 보냄. 그러면 render 는 바뀐 state 값을 가져오고 화면은 바뀌게 됨.
3. Redux가 좋은 가장 중요한 이유
redux 사용하면 store가 변경내역과 이력도 다 가지고 있음. 어플 상태에 대한 버젼관리가 된다는 개념.
Redux DevTools 설치 필수.
장점 한마디 정리
중앙집중적인 데이터 스토어 관리를 통해서 어플을 쉽게 개발할 수 있다는점
4. Redux 없이 애플리케이션 만들기
개 노가다!
without-redux.html
<html>
    <body>
        <style>
            .container {
                border:5px solid black;
                padding: 10px;
            }
        </style>
        <div id="red"></div>
        <div id="green"></div>
        <div id="blue"></div>
        <script>
            function red() {
                document.querySelector('#red').innerHTML = `
                    <div class="container" id="component_red">
                        <h1>red</h1>
                        <input type="button" value="fire" onclick="
                        document.querySelector('#component_red').style.backgroundColor='red';
                        document.querySelector('#component_green').style.backgroundColor='red';
                        document.querySelector('#component_blue').style.backgroundColor='red';
                        ">
                    </div>
                `;
            }
            red();

            function green() {
                document.querySelector('#green').innerHTML = `
                    <div class="container" id="component_green">
                        <h1>green</h1>
                        <input type="button" value="fire" onclick="
                        document.querySelector('#component_red').style.backgroundColor='green';
                        document.querySelector('#component_green').style.backgroundColor='green';
                        document.querySelector('#component_blue').style.backgroundColor='green';
                        ">
                    </div>
                `;
            }
            green();

            function blue() {
                document.querySelector('#blue').innerHTML = `
                    <div class="container" id="component_blue">
                        <h1>blue</h1>
                        <input type="button" value="fire" onclick="
                        document.querySelector('#component_red').style.backgroundColor='blue';
                        document.querySelector('#component_green').style.backgroundColor='blue';
                        document.querySelector('#component_blue').style.backgroundColor='blue';
                        ">
                    </div>
                `;
            }
            blue();
        </script>
    </body>
</html>
5. Redux를 이용해서 애플리케이션 만들기
https://opentutorials.org/module/4078/24938
강의 1 - store 생성
아래 소스 내의 주석은 00~04 의 순서로 진행하면서 메모한 내용임.
with-redux.html
<!DOCTYPE html>
<html>
    <head>
        <script src="https://cdnjs.cloudflare.com/ajax/libs/redux/4.0.5/redux.js"></script>
    </head>
    <body>
        <style>
            .container {
                border:5px solid black;
                padding: 10px;
            }
        </style>
        <div id="red"></div>
        <script>
function reducer(state, action){ // reducer 의 인자값을 기존의 state 값과 action 으로 고정되어 있음.
    // 01. dispach 에 의해서 action 이 들어오게 되면 reducer가 그 action값과
    // 기존에 있던 state의 값을 참조해서 새로운 state의 값을 만들어 주는 것이 reducer의 역할임.
    // 은행으로 치면 dispatch 가 창구직원
    // reducer 가 실제 장부에 금액을 적는 사람
    // state 가 은행장부 에 해당함.

    // 02. store 를 처음으로 만들때 그 state 의 초기값이 필요함.
    // state의 값이 아직 셋팅되지 않았으면 undefined
    // state 값이 아직 정의되지 않았다. => 즉 최초의 초기화 단계라는 뜻.
    // 초기화를 위해 최초로 실행되는 reducer에 대한 호출임.
    if(state === undefined) {
        // 초기 state 설정.
        // 원하는 초기값을 설정해 준다.
        return {color:'yellow'}
    }


}
// 00. Redux 를 설치하면 Redux 객체가 생긴다. 그럼 createStore 라는 api를 사용할 수 있게 되는데
// createStore의 입력값으로는 reducer 라는게 들어가야 함.

// 03. 아래와 같이 선언하면 store가 store 라는 전역변수에 저장이 된다.
// 그럼 이놈은 어플 어디서든지 실행이 되는 코드가 된다.
var store = Redux.createStore(reducer);//createStore 의 입력값으로 reducer 가 있어야 함.

// 04. store 에 저장된 state 의 값을 조회해 보자.
// 그럴려면 getState 를 써야 함. 아래 console.log로 확인해 보자.
console.log(store.getState());

function red() {
    var state = store.getState(); // 05. state 값을 가져온다.
    // 06. state 로 컴포넌트의 초기값을 설정할 수 있다.
    document.querySelector('#red').innerHTML = `
        <div class="container" id="component_red" style="background-color:${state.color}">
            <h1>red</h1>
            <input type="button" value="fire" onclick="
            document.querySelector('#component_red').style.backgroundColor='red';
            document.querySelector('#component_green').style.backgroundColor='red';
            document.querySelector('#component_blue').style.backgroundColor='red';
            ">
        </div>
    `;
}
red();
        </script>
    </body>
</html>
6. 강의 2 - reducer와 action을 이용해서 새로운 state 값 만들기
아래 소스 내의 주석은 01~10 의 순서로 진행하면서 메모한 내용임.
with-redux.html
<!DOCTYPE html>
<html>
    <head>
        <script src="https://cdnjs.cloudflare.com/ajax/libs/redux/4.0.5/redux.js"></script>
    </head>
    <body>
        <style>
            .container {
                border:5px solid black;
                padding: 10px;
            }
        </style>
        <div id="red"></div>
        <script>
function reducer(state, action){
    console.log(state, action);
    // 03. 처음 한번 실행할땐 무조건 undefined
    if(state === undefined) {
        return {color:'yellow'}
    }
    // 04. 인자로 받은 현재의 store 의 state 값을 변경해서 걔를 return 하지 말고
    // 이전의 state 값을 복제하고 그 복제된 복사본을 변경한 다음에 걔를 return 해야함.
    // (이유는 store 의 이력관리 핫모듈리로딩 기능을 사용하기 위해)
    /*
    // 나쁜 예시 - 인자로 받은 현재의 store의 값을 변경해서 그대로 return.
    if(action.type === 'CHANGE_COLOR'){
        state.color = 'red';
    }
    return state;
    */

    // 05. 객체를 복제할때는 Object.assign 이라는 명령을 이용한다.
    // 첫번째 인자로 반드시 빈 객체를 주어야 함.
    // 두번째 인자로 빈 객체의 복제할 속성을 가진 객체를 주어야 함.
    // 두번째 인자 이후부터는 다 첫번째의 빈 객체에 복사된다.
    // (첫번째 인자에 두번째 인자 복사후 세번째 인자를 복사한다)
    //
    // Object.assign({}, {name:'egoing'},{city:'seoul'}); <- 이걸 실행하면
    // {name: "egoing", city: "seoul"} <- 이런 객체가 만들어진다.
    // 첫번째 인자로 반드시 빈 객체를 주어야 함. 왜냐? Object.assign의 리턴값은 첫번째 인자인 객체이기 때문임.

    var newState; // 06.
    if(action.type === 'CHANGE_COLOR'){
        // 06. 첫번째 인자로 빈 객체를 주고 두번째 인자로 state 를 주게 되면
        // state 들의 property 들이 첫번째 인자인 빈 객체에 복제되서 그게 return 됨.

        // 07. 첫번째 인자가 빈 객체
        // 두번째 인자가 현재의 state (복제 1회차)
        // 세번째 인자가 변경된 값 (복제 2회차. 두번째 인자인 현재의 state 의 color 값을 덮어쓰게 된다.)
        newState = Object.assign({}, state, {color:'red'});
    }

    // 08. 이전엔 원본인 state 를 직접 return 했는데
    // 이제는 state 를 복제하고 그 복제한 것의 값을 변경해서 return 하게 된다.

    // 09. 그로인해 reducer 가 실행될때 마다 새로운 state 값이 된다.
    // 각각의 state 값들이 완전히 독립된 복제된 결과들이 return 되야 한다.
    return newState;

    // 10. reducer 가 하는 역할은 store 의 state 값을 변경해 준다.
    // 어떻게? action 의 값과 이전의 state 값을 이용해서 새로운 state 값을 return 해 주면 그 값이 새로운 state 값이 된다. 는 것이 핵심.
    // 그리고 원본을 바꾸는게 아닌 복제한 결과를 return 해야지만 redux의 기능을 최대한 활용할 수 있다.
}

var store = Redux.createStore(reducer);

function red() {
    var state = store.getState();
    document.querySelector('#red').innerHTML = `
        <div class="container" id="component_red" style="background-color:${state.color}">
            <h1>red</h1>
            <input type="button" value="fire" onclick="
                store.dispatch({type:'CHANGE_COLOR', color:'red'});
            ">
        </div>
    `;
    // 01. dispatch 에 type은 필수항목임.

    // 02. store에 dispatch 를 호출하게 되면 (store.dispatch()) 이 dispatch 는 우리가 store 를 생성할때 제공한 reducer라는 함수를 호출하도록 약속되어 있음.
    // 그리고 reducer는 이전의 state 값과 전달된 action 값을 인자로 준다.
    // store.dispatch({type:'CHANGE_COLOR', color:'red'}); 에서 {type:'CHANGE_COLOR', color:'red'} 부분이 action 에 해당한다.
    // (이전 state 값은 알아서 불러오는듯)

}
red();
        </script>
    </body>
</html>
7. 강의 3 - state의 변화를 UI에 반영하기
아래 소스 내의 주석은 01~10 의 순서로 진행하면서 메모한 내용임.
with-redux.html
<!DOCTYPE html>
<html>
    <head>
        <script src="https://cdnjs.cloudflare.com/ajax/libs/redux/4.0.5/redux.js"></script>
    </head>
    <body>
        <style>
            .container {
                border:5px solid black;
                padding: 10px;
            }
        </style>
        <div id="red"></div>
        <div id="blue"></div>
        <div id="green"></div>
        <script>
function reducer(state, action){
    console.log(state, action);

    if(state === undefined) {
        return {color:'yellow'}
    }

    var newState;
    if(action.type === 'CHANGE_COLOR'){
        // 03. action.color 값을 설정해 준다.
        newState = Object.assign({}, state, {color:action.color});
    }

    // 현재 action 타입, action, 이전 state, 새로운 state 를 디버깅.
    console.log(action.type, action, state, newState);

    return newState;
}
// 04. redux 라는 중계자를 통해서 상태를 중앙집중적으로 관리하게 되면
// 각각의 부품은 상태가 바뀌었을때 상태가 바뀌었다는걸 store 에 dispatch 해 주면 된다.
// 그리고 그에 따라서 자신이 어떻게 변화해야 하는지에 대한 코드를 작성하고
// (렌더링 함수. 이 예제에서는 red(), blue(), green() 이 이에 해당함)
// 그것을 store 에 구독을 시켜주면 (예) store.subscribe(red))
// 바뀔때 마다 통보를 받기 때문에 그때마다 자신의 모양을 바꿔줄 수 있다.
// 이와 같이 적으면 각각의 부품은 서로에 대해 인식할 필요 없이 store 의 state 상태만 보고 자기 일을 하면 된다.
// 예를 들어 blue 라는 컴포넌트를 만들때는 blue 라는 컴포넌트가 해야할 일에만 집중하면 된다.
// 이런걸 디커플링 한다고 표현한다.
// 어떻게 redux를 통해서 서로간의 의존성을 낮추고 각자의 부품은 stand alone 으로 사용될 수 있었는지를 복습해 보자.
var store = Redux.createStore(reducer);

// 01. state 값이 바뀔때 마다 (예를 들어 dispatch 할때 마다) 렌더링 함수를 호출하게 하려면
// subscribe 에 해당 함수를 등록해 두면 된다.

// red 컴포넌트
function red() {
    var state = store.getState();
    document.querySelector('#red').innerHTML = `
        <div class="container" id="component_red" style="background-color:${state.color}">
            <h1>red</h1>
            <input type="button" value="fire" onclick="
                store.dispatch({type:'CHANGE_COLOR', color:'red'});
            ">
        </div>
    `;
}
// 02. 아래와 같이 선언하면 state 값이 바뀔때 마다 red 함수가 호출된다.
store.subscribe(red);
red();

// blue 컴포넌트
function blue() {
    var state = store.getState();
    document.querySelector('#blue').innerHTML = `
        <div class="container" id="component_red" style="background-color:${state.color}">
            <h1>blue</h1>
            <input type="button" value="fire" onclick="
                store.dispatch({type:'CHANGE_COLOR', color:'blue'});
            ">
        </div>
    `;
}

store.subscribe(blue);
blue();

// green 컴포넌트
function green() {
    var state = store.getState();
    document.querySelector('#green').innerHTML = `
        <div class="container" id="component_red" style="background-color:${state.color}">
            <h1>green</h1>
            <input type="button" value="fire" onclick="
                store.dispatch({type:'CHANGE_COLOR', color:'green'});
            ">
        </div>
    `;
}

store.subscribe(green);
green();
        </script>
    </body>
</html>
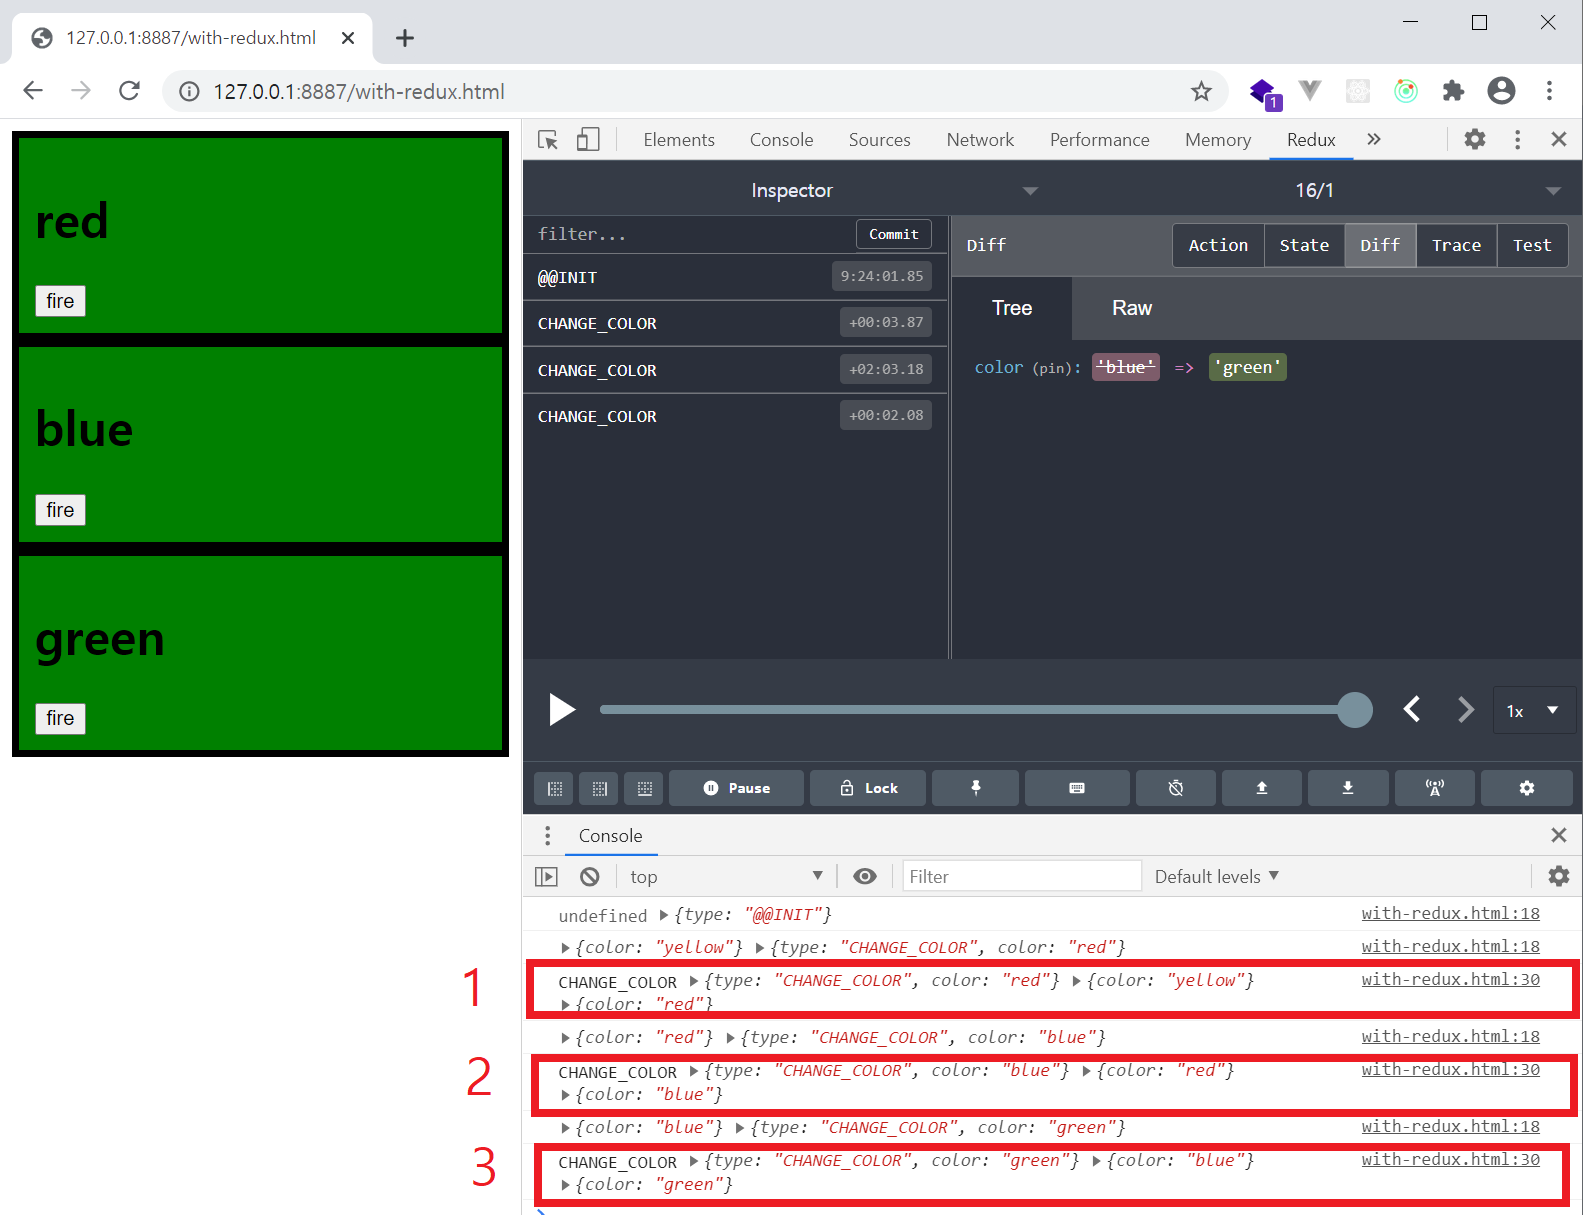
8. Redux 선물 - 시간여행 디버깅
Redux Dev Tools No store found 문제 해결 방법
Redux dev tools 로 이렇게 디버깅 할 수 있고…
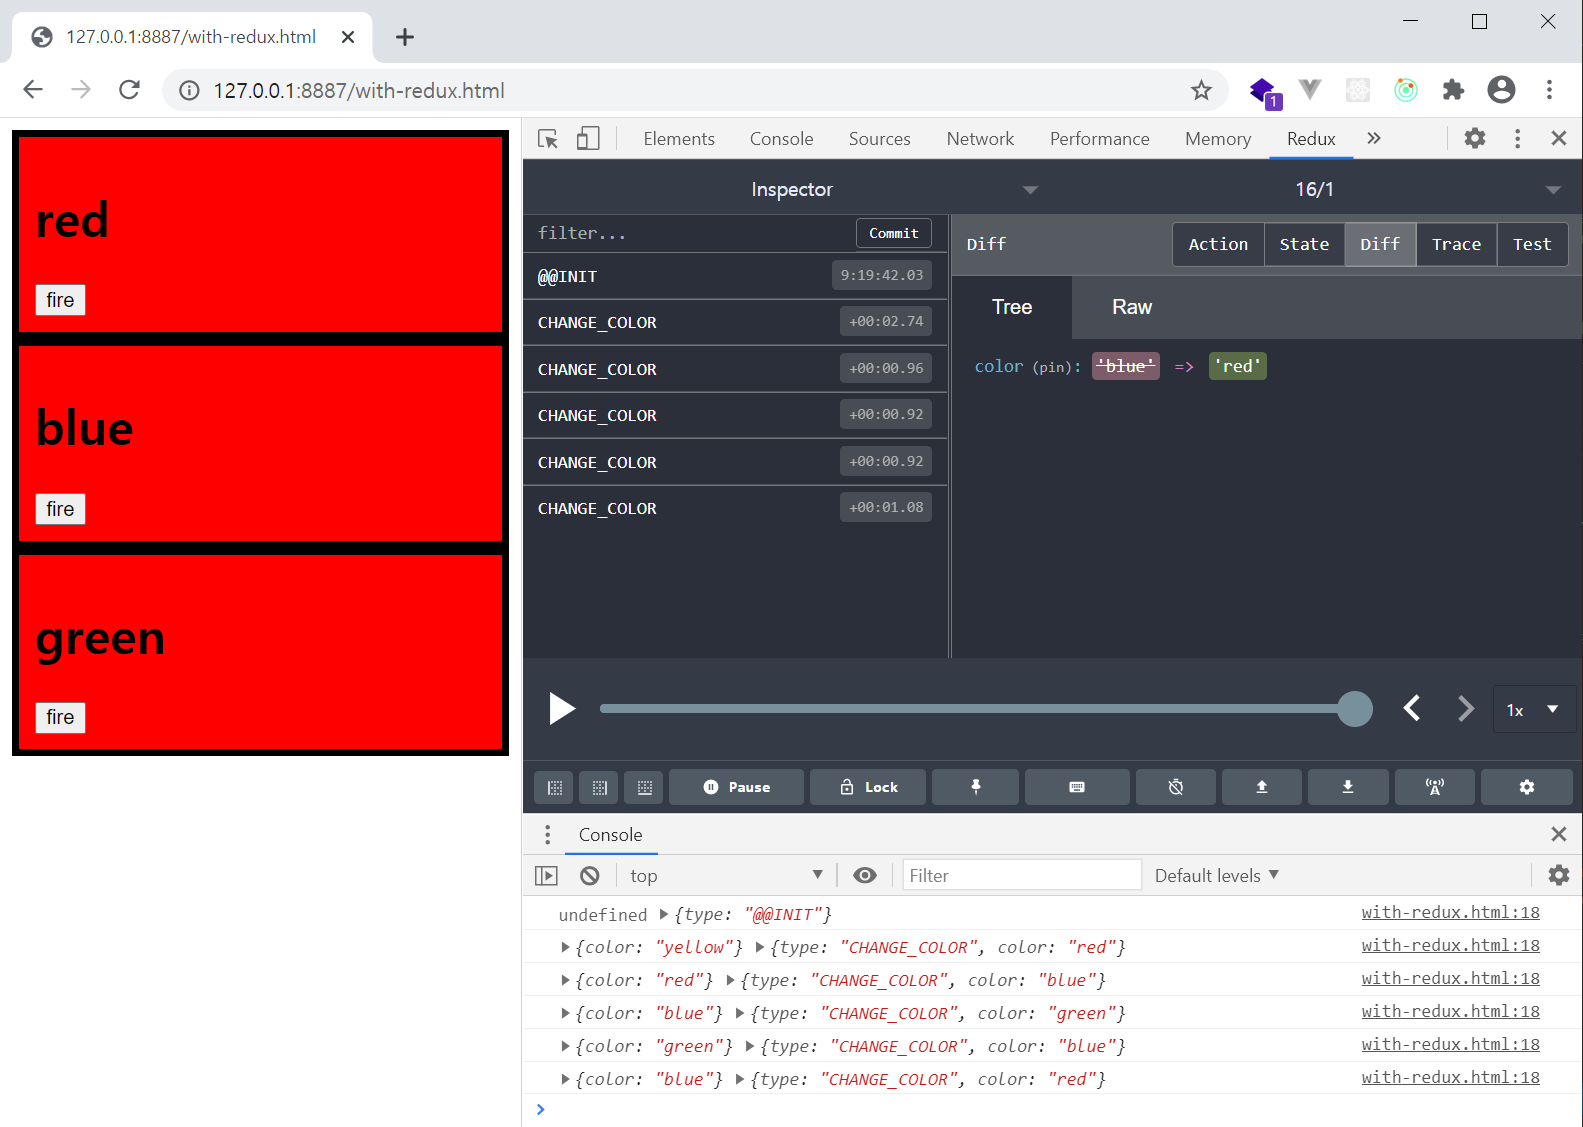
reducer 함수 안에서 아래와 같이 console.log 를 찍어보면 값이 변하는 과정을 바로 확인할 수 있다.
// 현재 action 타입, action, 이전 state, 새로운 state 를 디버깅.
    console.log(action.type, action, state, newState);
Pie's Tech Note
생계형 개발자의 메모장